TECHNICAL INFORMATION - Check Valve Anchorage Principle
The required bore roughness is directly related to the hardness and the mechanical characteristics of the base material. Depending on the combination of the KOENIG CHECK VALVE® and the base material, anchorage takes place either by the groove profile of the KOENIG CHECK VALVE® sleeve biting into the base material or on anchorage to the surface roughness of the bore.
Note:
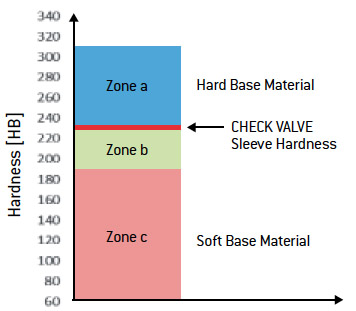
When selecting a KOENIG CHECK VALVE®, the bore roughness must always be adjusted according to the hardness of the base material. Anchorage between sleeve and base material is achieved when the sleeve is a minimum of HB = 30 greater than the base material. If the hardness difference is less, hole roughness of 10 to 30 μm is needed to achieve good anchorage for the rated working pressure differential values.

Zone a – Hard Base Material (HB > 220)
To achieve the allowable working pressure, anchorage to the bore roughness of the base material is required.
Roughness RZ = 10 – 30 μm.
Zone b – Transition Zone (HB 190 – 220)
To achieve the allowable working pressure, anchorage to the bore roughness of the base material is required.
Roughness RZ = 10 – 30 μm.
Zone c – Soft Base Material (HB < 190)
Anchorage to the bore of the base material occurs automatically due to the serrations on the sleeve.

ROUGHNESS PROFILE

Required Roughness Profile – The ideal bore roughness for anchorage is attained by drilling with a twist drill or a core drill.

Undesirable Roughness Profile – By reaming, a one-sided, smooth roughness profile is created. This is not desirable.
